 GearPort
Fish Finders: How They Work and How to Mount One on Your Boat
A fish finder is a sonar unit with a screen. A transducer under the boat sends a pulse of sound into the water, listens for the echoes, and the display draws those echoes as a picture of the bottom, the water column and anything solid in between. Mount the transducer where it sees clean water, mount the screen where you can read it without leaning, and the unit does its job.
Most complaints about fish finders are mounting complaints in disguise. A screen that washes out in the sun, a transducer in propeller wash that goes blank above idle speed, a cable crossing a rod track and snagging line. None of that is a fault in the electronics. This guide covers what the sonar is actually showing you, then works through mounting the display and the transducer on a kayak and on a small powerboat.
GearPort does not sell fish finder units. It does stock the mounting hardware that goes with them, including the RAILBLAZA HEXX Fish Finder Mount, adjustable ball arms, phone holders and gear caddies, plus the circuit breakers and bus bars you need to power the unit properly.
What a fish finder actually shows you
The transducer is the part that does the work. It converts electrical energy into a sound pulse, fires it downward, then converts the returning echoes back into electrical signals. Hard objects return a strong echo. Soft ones return a weak one. The unit measures how long each echo took to come back, and that time becomes depth.
The display draws this as a history that scrolls from right to left. The newest ping is always on the right edge. Everything to the left of it happened a second ago, five seconds ago, a minute ago. This is the single thing most new owners misread. A shape in the middle of the screen is not under you now. You have already passed over it.
The thick line across the lower part of the screen is the bottom return. A hard bottom, rock or packed sand, gives a thick bright line and often a second echo below it where the sound bounced between the bottom and the surface twice. Soft mud absorbs sound and gives a thinner, dimmer line. Above the bottom you get the water column: suspended bait showing as clouds or clusters, individual fish showing as arches or dots, and structure such as weed, timber or rock rising from the bottom.
Fish arches happen because the sonar beam is a cone, not a laser. As the boat passes over a fish, the fish enters the edge of the cone far away, passes through the centre close, and leaves at the far edge again. That changing distance draws an arch. A fish holding still under a stationary kayak draws a flat line instead, which is why arches disappear when you stop moving.
Traditional sonar, down imaging and side imaging
Traditional sonar uses a fairly wide cone and shows you the water column in a general way. It is good at depth, bottom hardness and spotting bait and fish away from the boat's exact track. It is less good at telling two fish apart when they sit close together, because everything in that wide cone gets painted at the same depth on screen.
Down imaging uses a high frequency beam that is narrow front to back and wide side to side, like a thin blade pointed straight down. The result looks much more like a photograph. Timber looks like branches, a bridge piling looks like a piling. You give up some of the fish-arch behaviour and some depth range, and you gain detail. Many anglers run traditional sonar and down imaging side by side on a split screen for this reason.
Side imaging fires that same blade-shaped beam out to both sides of the boat instead of straight down. It covers a wide swathe of bottom at once and is the fastest way to find isolated structure on an unfamiliar flat. Shadows matter more than returns here: an object standing off the bottom throws a shadow away from the boat, and the shadow tells you its height.
CHIRP is not a fourth type. It describes how the pulse is sent. Instead of one fixed frequency, a CHIRP transducer sweeps across a range of frequencies in each pulse, which separates targets that sit close together more cleanly. You will see it offered on both traditional and imaging units. Some multi-channel CHIRP sounders need a splitter to run more than one transducer, and GearPort stocks the Furuno FCV800 Y-Cable for that unit specifically.
Screen size, and where it has to sit
Pick the screen by how far your eyes sit from it and whether you intend to split it. A small screen is fine for a single sonar view an arm's length away on a kayak. The moment you split it into sonar plus chart, or sonar plus down imaging, each half is half as useful on a small display. If you plan to run split views, buy more screen than you think you need.
Placement beats size every time. The unit has to sit where you can read it from the position you actually fish in, which on a kayak is seated and often turned slightly, and on a small boat is standing at the console or sitting on a bench. Hold the unit in place before you drill anything and spend a few minutes in your real fishing posture.
Glare is the other half of the problem. A screen tipped face up toward an open sky reflects that sky straight into your eyes. Tilting the display down a few degrees so it reflects the deck instead of the sky makes a far bigger difference than any screen setting. This is why a mount with a genuine tilt range matters more than a rigid bracket.
On a powerboat, also consider the compass. Electronics and current-carrying cables can cause compass deviation. Fit the display, then check your compass heading against a known bearing before you trust it.
Mounting the display: rails, tracks and adjustable arms
There are three ways the display gets attached. A fixed base screwed to the deck or gunwale, a rail clamp that grips a tube, or a track mount that slides into an accessory rail already fitted to the hull. Kayaks mostly use track. Small boats use a mix of all three.
What matters more than the attachment method is the joint between the base and the unit. You want rotation so you can swing the screen toward you, and tilt so you can kill glare. The RAILBLAZA HEXX Fish Finder Mount is built for this job: a three-axis adjustable base with 90 degrees of base rotation, 90 degrees of platform rotation and 180 degrees of tilt, and RAILBLAZA list it as compatible with Garmin, Lowrance and Humminbird units. The three axes let you swing and tilt the screen until the glare is gone.
A ball-and-socket arm is the other approach. The Scotty 2.25 in Ball System with an 8 in arm gives you 360 degree rotation and 180 degree tilt at both ends, which lets you get a screen out over a gunwale or up off a crowded deck. Longer arms flex more under way, so keep the arm no longer than the job needs.
Removable mounting is worth paying for on any boat that lives outside or on a trailer. A display that lifts off in five seconds does not get stolen, does not sit in the sun all week, and does not get snapped off by a low branch on the way home. Fit the socket permanently, take the head with you.
Mounting the transducer: transom, in-hull and kayak scupper
The transducer only works if it is looking at solid, bubble-free water. Air in the water scatters sound, and the screen goes blank or fills with clutter. Everything about transducer placement comes down to avoiding bubbles.
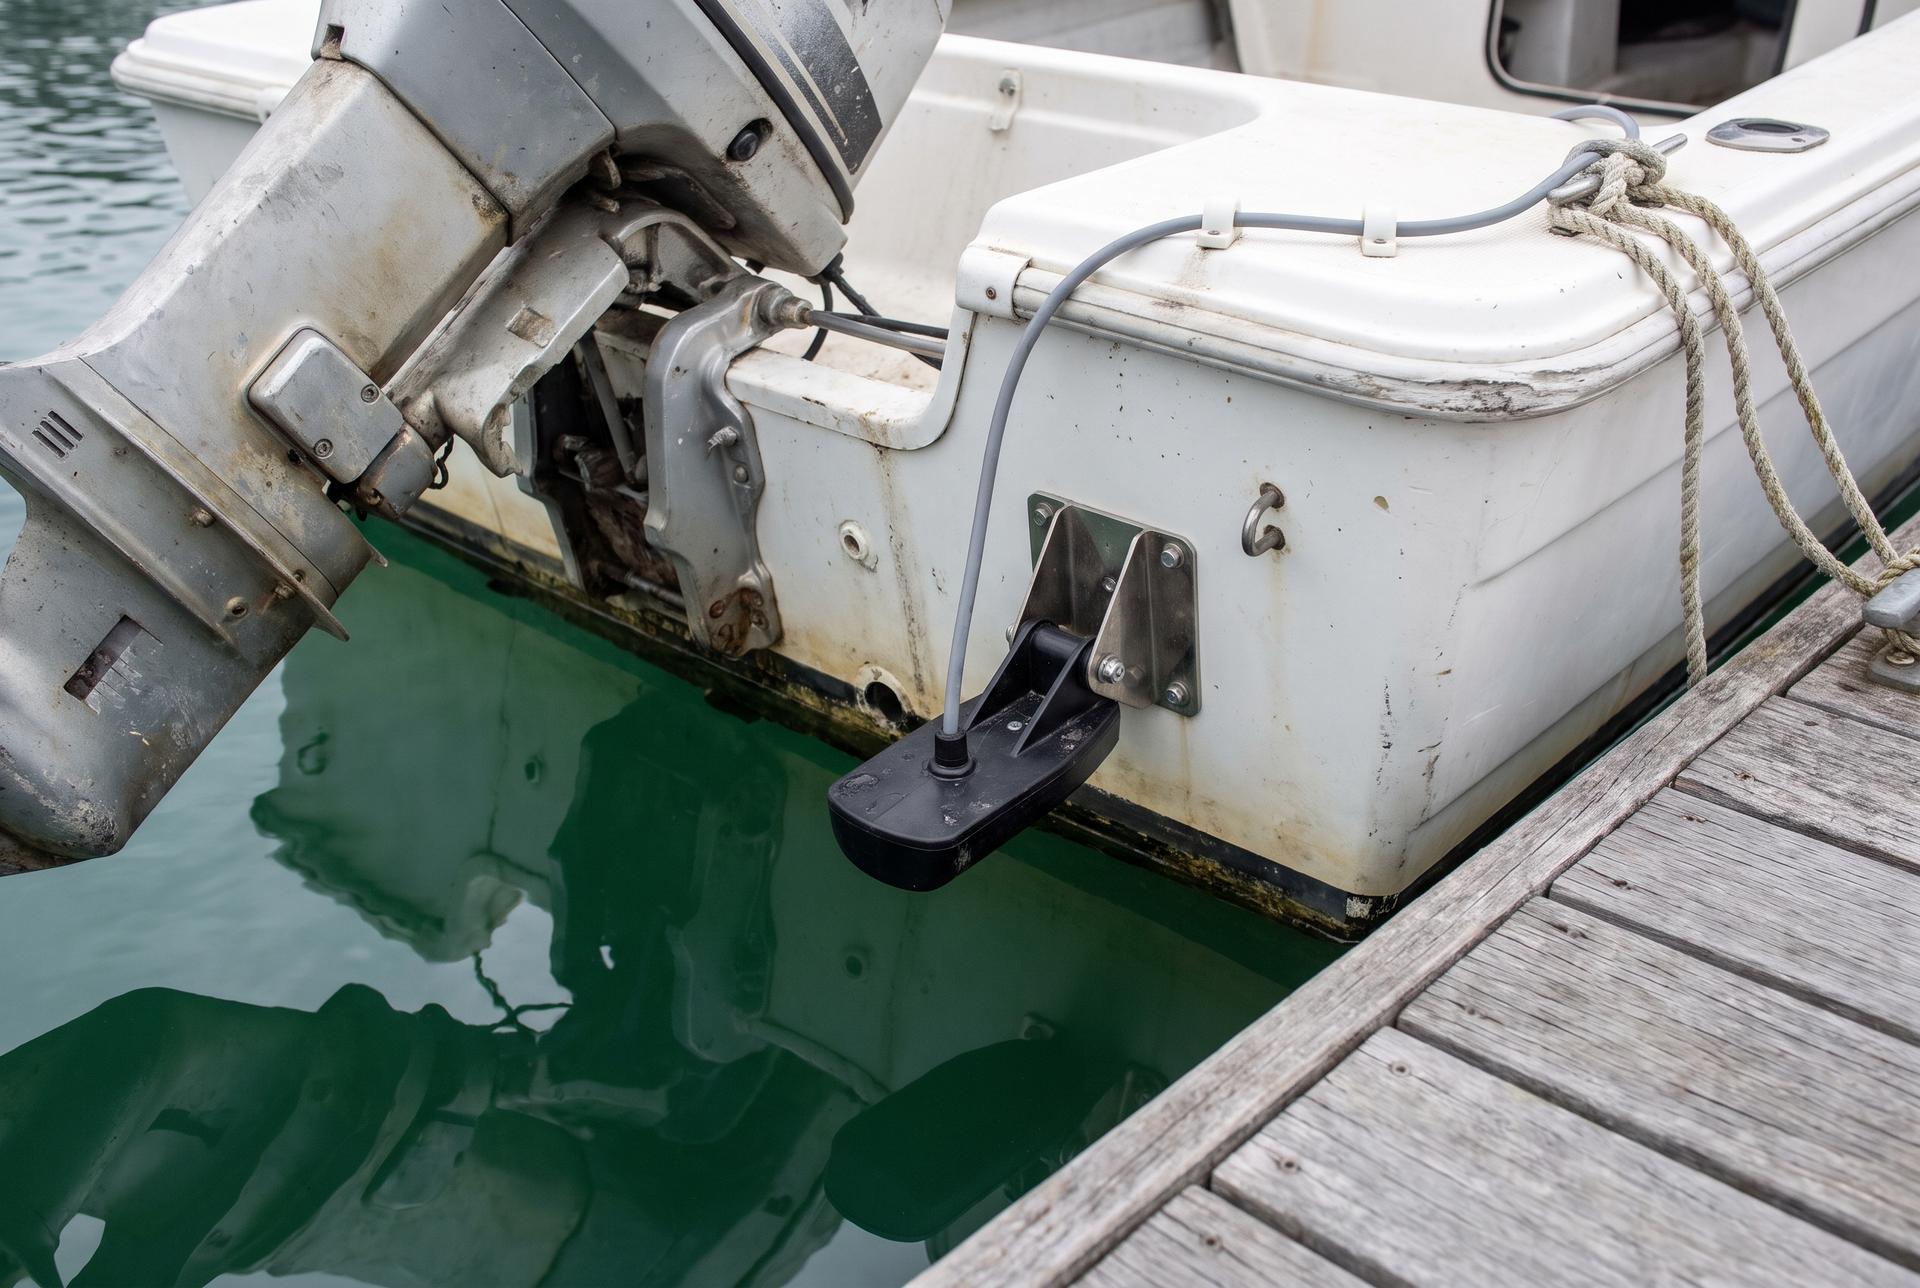
On a powerboat the usual answer is a transom mount. As a general rule of thumb with a standard right-hand-rotation propeller, fit it on the starboard side of the transom, away from the propeller wash, and clear of strakes, through-hull fittings and the trailer rollers. The face of the transducer should sit level with or very slightly below the bottom of the hull, and parallel to the water surface at rest. Too high and it leaves the water on plane. Too low and it drags and throws spray. Most transom brackets slot vertically so you can slide it up or down after a test run, which is exactly what you should do: run it, read the screen at speed, come back and adjust.
An in-hull mount glues the transducer inside the boat, shooting through solid fibreglass. It cannot be knocked off and cannot catch weed, but you lose some signal through the hull and it will not work through a cored or foam-filled bottom. Some functions, including most imaging modes and any temperature reading, want direct water contact and will not shoot through a hull at all.
Kayaks have three common options. A scupper mount drops the transducer through an existing scupper hole so it sits in the water with no drilling. An in-hull puck sits inside the hull in a shallow well of water or a gel pad, which is tidy and protected but limits you to downward sonar. An arm mount swings the transducer over the side, which is the easiest to fit and the easiest to hit on a shallow rock. Whichever you choose, keep the transducer behind any hull feature that trips air and ahead of your paddle stroke.
Power and cable routing
A fish finder runs on 12 volt DC and wants a clean supply. Wire it from the battery through its own fuse or breaker, not spliced into a lighting circuit, and not off a cigarette socket if you can avoid it. Voltage sag from a trolling motor on the same circuit shows up as the display rebooting at the worst moment.
Circuit protection goes close to the power source, at the start of the run, so the wire itself is protected along its full length. On a small boat a panel mount or surface mount breaker is an easy way to get both protection and a switch in one fitting. GearPort stocks 30A and 60A Egis Mobile Electric breakers and Blue Sea Systems battery terminal bus bars for tidying up a battery post that is collecting too many ring terminals. For how to size the wire itself, see the marine wire size chart guide.
Route the sonar cable and the power cable separately where you can, and keep both away from the compass and from any rod track where a line can catch. Leave a service loop near the display so the unit can be lifted and turned without stretching anything, and secure the rest with clips at regular intervals. A loose cable chafes and a chafed sonar cable is not repairable in any useful way.
On a kayak, the battery usually lives in a sealed box in the hatch or behind the seat. Keep the terminals above any water that gets in, use a connector you can unplug by feel, and carry the battery out at the end of the day rather than leaving it in a hot hull.
Setting it up on a kayak versus a small powerboat
On a kayak, everything is within reach and everything is in the way. Start from the seated position. The display wants to be forward of your knees and slightly to one side, high enough to see over the bow mound but low enough that it does not block your view of the water. Use the track system the kayak already has rather than drilling a hull you will later want to sell, and fit a socket-based mount so the head comes off at the car.
Kayak speeds are low, which is good news for the transducer. Bubble problems are rare under paddle, so a scupper or arm mount works well. Expect to spend more time on cable management than on the mount itself, because a kayak deck has nowhere to hide a cable and anything standing proud will catch braid.
A small powerboat has the opposite set of problems. Mounting points are easy, but speed, wash and vibration are not. Get the transducer height right by testing, keep it out of the propeller stream, and use a mount that holds the screen still at planing speed rather than nodding in time with the chop. Check every fastener that goes through the transom is bedded with sealant, because a transom that takes on water is an expensive repair.
On both, think about what the unit will do when you are not fishing. Trailer branches, dock pilings and other people's gaffs all find exposed screens. A removable head and a socket you can cap over solves most of it.
Matching the rest of the deck
Once there is a socket or track on the boat, the same hardware carries everything else. That is the real argument for a track and socket system over one-off brackets: one mounting standard, several heads, and a clean deck when nothing is fitted.
A phone holder is the most common second head. The Scotty Phone Holder ships with post, track and rail mounts and runs dual ball joints so you can angle a phone away from the sun, and the Deep Blue Marine Suction Cup Cell Phone Holder CPH-1 goes on and off a smooth gunwale without tools.
Tackle organisation is the other half. The Scotty Mini Gear Caddy holds line grippers, pliers, lures and a rod rest in one compact unit, and the larger Scotty Gear Caddy adds a magnetic tray so hooks stay put instead of rolling into the bilge. Both suit a kayak deck as well as a boat.
If you fish after dark, lighting changes what the sonar is for. Underwater and dock-mounted fishing lights pull bait into a known spot and the sounder then tells you what came with it. GearPort stocks the Hydro Glow HG1000G underwater light, the Hydro Glow DockMaster DM260A dock light and the Lumitec Zambezi Mini surface mount underwater light, covered in the underwater boat lights guide.
Mounts and adjustable arms
Bases and arms for holding a display, a phone or a camera where you can see it.
Power and circuit protection
Breakers, bus bars and switches for giving the unit a clean 12 volt supply.
Deck gear for the rest of the setup
Tackle caddies, a transducer Y-cable and fishing lights that work with the sounder.
Common questions
- Where should I mount a fish finder transducer on a small boat?
- On the transom, on the starboard side, outside the propeller wash and clear of strakes and through-hull fittings. The face should sit level with or just below the bottom of the hull and parallel to the water at rest. Most brackets allow vertical adjustment, so run the boat, watch the screen at speed, then move it up or down a little and test again.
- How do I mount a fish finder on a kayak without drilling?
- Use the accessory track the kayak already has. A track-compatible mount bolts to nothing new and lifts out when you are done. For the transducer, a scupper mount drops through an existing hole, and an in-hull puck sits inside the hull with no hole at all.
- Why does my fish finder lose the bottom at speed?
- Almost always air under the transducer. Either it is sitting too high and lifting clear of the water on plane, or it is in the turbulence from a strake, a through-hull or the propeller. Lower it a small amount, check it is parallel to the water, and move it further from anything that disturbs the flow ahead of it.
- Do I need side imaging, or is traditional sonar enough?
- Traditional sonar is enough for depth, bottom type and finding bait under the boat. Side imaging earns its place when you are searching unfamiliar water for isolated structure, because it covers ground either side of your track rather than only what you pass directly over. Down imaging sits between the two and gives a clearer picture of structure directly below.
- Can I wire a fish finder straight to the battery?
- Yes, with circuit protection fitted close to the battery so the whole run is protected. Give it its own circuit rather than sharing with a trolling motor or lights, since voltage sag causes the display to reboot. GearPort stocks surface and panel mount breakers that combine protection with a manual switch, and bus bars for tidying crowded battery posts.
- Does GearPort sell fish finder units?
- No. GearPort stocks the mounting hardware and the electrical parts that go around a fish finder: the RAILBLAZA HEXX mount, Scotty ball arms and phone holders, gear caddies, breakers, bus bars and a Furuno CHIRP transducer Y-cable. Buy the unit elsewhere and fit it with parts that are in stock here.
Sources
- RAILBLAZA HEXX Fish Finder Mount 11-4174-11 product description, GearPort catalog listing
- Scotty 2.25 in Ball System 8 in Arm 0171 product description, GearPort catalog listing
- Scotty Phone Holder 0139 product description, GearPort catalog listing
- Egis Mobile Electric 285 Series 4703-030 and 4701-60 product listings, GearPort catalog
- Blue Sea Systems Battery Terminal Mount BusBars 2340 product listing, GearPort catalog
- Furuno FCV800 Y-Cable CHIRP Transducer 001-636-150-00 product description, GearPort catalog listing
- Standard small-craft DC system voltage; see GearPort marine wiring basics guide
- Scotty 451 Mini Gear Caddy 0451 product description, GearPort catalog listing
- Scotty 452 Gear Caddy 0452 product description, GearPort catalog listing